A Microsoft Windows keyboard shortcut is extremely useful if you’d like to quickly open applications, open files, or run scripts you use frequently.
The following steps are used to set up a Microsoft Windows keyboard shortcuts.
- Right click on the file (or application) and left click “copy”
- Right click in a directory and left click “Past Shortcut”
- Right click on the shortcut you just created and left click “Properties”
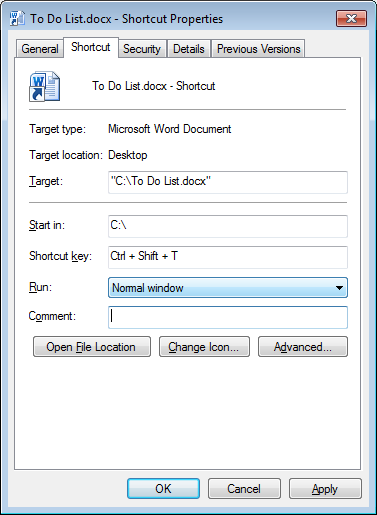
- Select the “Shortcut” tab by left clicking on it.
- Select the “Shortcut Key” field by left clicking in the text box
- While in the “Shortcut Key” field type the shortcut key sequence you desire. (In the graphic, I entered the CTRL+SHIFT+T shortcut key sequence by holding down the CTRL, SHIFT, and T key. You may also choose ALT, WIN, or other key combinations as well.)
- Left click “OK” to apply the changes and exit the properties window
- From now on, when you type that “Shortcut Key” sequence the shortcut will be executed.
Please note that many applications have assigned shortcut keys by default. Your newly assigned Microsoft Windows keyboard shortcut may not work if used within a program that has the same keyboard shortcut assigned.
You may also want to consider saving all your Microsoft Windows keyboard shortcuts with quick keys assigned in the same directory. Otherwise they may be hard to track down later.
Before you leave don’t forget to:
- Subscribe to the blog in the right side panel.
- Share this article with your friends!
- Leave a comment